
![]()
![]()
![]()
![]()
![]()
![]()
![]()
|
|
|
|
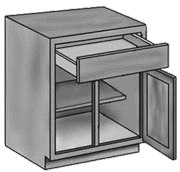
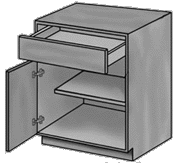
Two most common types of cabinets for pull out shelf installation
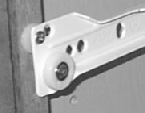
Kitchen pullout shelf install instructions Contents 1 - sliding shelf with attached slides 1 pair - cabinet slide members with attached L brackets 8 - #6 x 5/8" Screws 4 - 1/8" spacers Your sliding pull-out shelf can be mounted to either a full depth shelf (or cabinet base) or to a half depth shelf with the included L brackets and spacers. First lets identify the included parts. The pull-out shelf has the shelf slide members already attached. The end of the shelf with the wheels is the back. Your cabinet slides come with two L brackets attached to each slide. The slides are marked just behind the back screw on the front bracket with either a CR for cabinet right or a CL for cabinet left. The cabinet slides are just the opposite with the wheels being the front end of the slides. The number one key to installing your shelves is to let the shelf be your installation tool. Use the shelf to determine the spacing for the cabinet slides. Locking the mounting shelf. Whether you are mounting on a full shelf or a half shelf the back of the shelf you are mounting on must be held down securely to prevent the sliding shelf from tipping when it is extended. The easiest way to secure your shelf is to install two screws in either the cabinet back or the back of the cabinet sides. Install the screws just above the shelf leaving the head of the screw out far enough to prevent the shelf from tipping. Depending on sliding shelf load and the thickness of your existing shelf you may need to find a more secure method of preventing the shelf from tipping. Full shelf or cabinet base installation Set the slides in position in your cabinet as pictured. Next place the shelf into position by lifting the wheels on the back of the shelf over the wheels on the front of the cabinet slides and into the rail behind the wheels. The left side track is free running, if the left side slide falls out of the track while mounting it can be put back on without extending the shelf. The right side is the control member and it must stay on the track while inserting the shelf. With the shelf on the slides and in your cabinet you can position the shelf so that it is square with the cabinet front and either centered in the opening or against the face frame opposite the door. Make sure that the cabinet members are seated forward fully. Next apply a slight pressure downward near the rear of the shelf as you slide the shelf forward enough to expose the rear bracket. Now mark the location of one of the rear brackets, if the slides move before you can get the location marked just close the shelf and start again. Once you have the location marked insert one of the #6 screws into one of the sideways slotted holes in the bracket and secure it to your mounting surface. Next close the shelf and check both shelf and slide alignment. Repeat the process for the second rear bracket. Close the shelf again and recheck the alignment. You can either mark the location of the front brackets with the shelf closed or carefully slide the shelf out lifting up on the front when it is extended to separate it from the cabinet slide members. It may take a couple of tries to get the shelf out without moving the brackets. With the shelf removed you can install a #6 screw into each front bracket using the slotted holes to allow for adjustment. Once all four brackets are secured with one screw each reinsert the shelf and check the alignment. Pay particular attention to the left side of the shelf, any alignment problems will show up on the left side. Once the slides are adjusted properly install a screw into the center hole of each bracket to secure them in position. plastic spacers are not used with the full shelf installation and they can be discarded. Half Shelf installation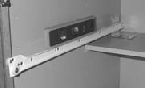
For cabinets that have a half or partial depth
shelf at the rear of the cabinet you will first need to remove the L brackets
from the front of the cabinet slides
(the end with the wheels). Next set one slide
in place with the rear bracket resting on the half shelf and level the front of
the slide. Mark the location of the slide and secure it to the cabinet face
frame with a #6 screw in the top hole of the
slide. Make the hole as close to the middle of the cabinet face frame as
possible and it is best to pre-drill the hole with a 3/32" bit. Mark the
other face frame at the same height as the first and secure the second slide in
the same manor as the first. |
|
Copyright © 2004 - 2025 Kitchen Pullout Shelf Last modified: November, 2025 Kitchen Pull Out Shelf is a division of Shelves That Slide the leader in top quality custom kitchen pullout sliding shelving for kitchen and bathroom cabinets Kitchen Shelves |

 Now you can put the shelf in position by lift the wheels on the rear of the
shelf over the wheels on the cabinet slides. If the opening is too wide
it will be necessary to use the spacers
provided to get the proper fit. If the opening is more than 1/4" wider than
the shelf it will be necessary to obtain thicker spacers to install the shelf.
If you cannot find spacers locally you can order them at
Now you can put the shelf in position by lift the wheels on the rear of the
shelf over the wheels on the cabinet slides. If the opening is too wide
it will be necessary to use the spacers
provided to get the proper fit. If the opening is more than 1/4" wider than
the shelf it will be necessary to obtain thicker spacers to install the shelf.
If you cannot find spacers locally you can order them at